Got a performance of Beauty and the Beast coming up? For about $200, you can build this Enchanted Rose with Falling Petals.
Dropping The Petals
There are a few approaches to make the petals drop. You’ve got a microcomputer (a Raspberry Pi) which can send electrical current HIGH or LOW on an output pin. How do you translate that into petals physically dropping on command?
In version 1.0, I used servo motors to pull fishing line. That fishing line was attached to a spring-loaded magnet in the bud of the rose. When the fishing line was pulled, the magnet would retract into the bulb and drop the petal. This worked very well, but it’s a delicate mechanism and wouldn’t ship well, and I wanted the 2.0 design to work for shipment.
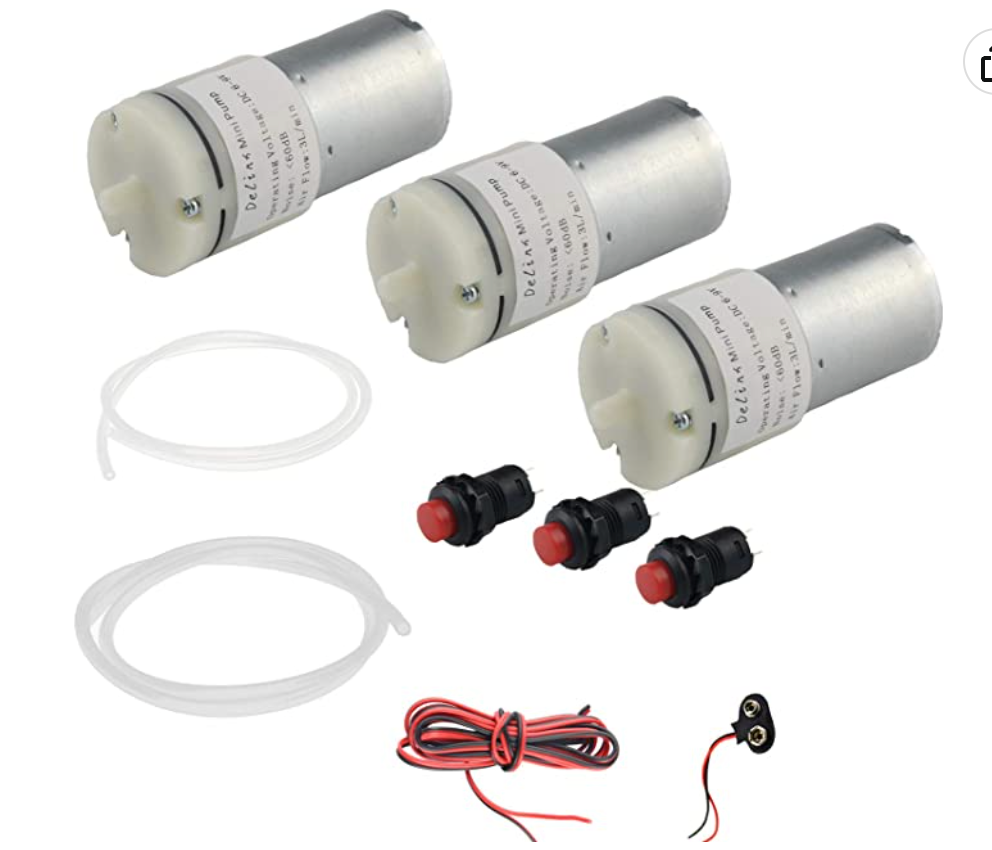
After horsing around with solenoids (which didn’t work very well because they (a) were too bulky and (b) weren’t strong enough), the design I ultimately settled upon was to use individual, cheap 6v air pumps to push air through a small opening, and blow out a toothpick, to which a petal was attached. I found that I could “overclock” the air pumps at 12V (higher than rated) to push slightly more air out than rated. As long as the rose petals remained relatively light, bingo, it works. Here’s an in-progress video:
Just some notes to the person who bought this prop, but it gives you an idea of the functionality of the final 2.0 design. It also shows how the cloche can interfere with the falling petals if not set properly. TIP: Find as wide a cloche as you can.
Here’s an earlier video showing mock petals which were much lighter — tissue paper:
Design Goals
Drop 4 petals on cue, one by one
Turn on and off stem lights
Turn on and off accent lights, set color
Easy to reset between productions
Wireless — allow to be set on a pedestal on stage
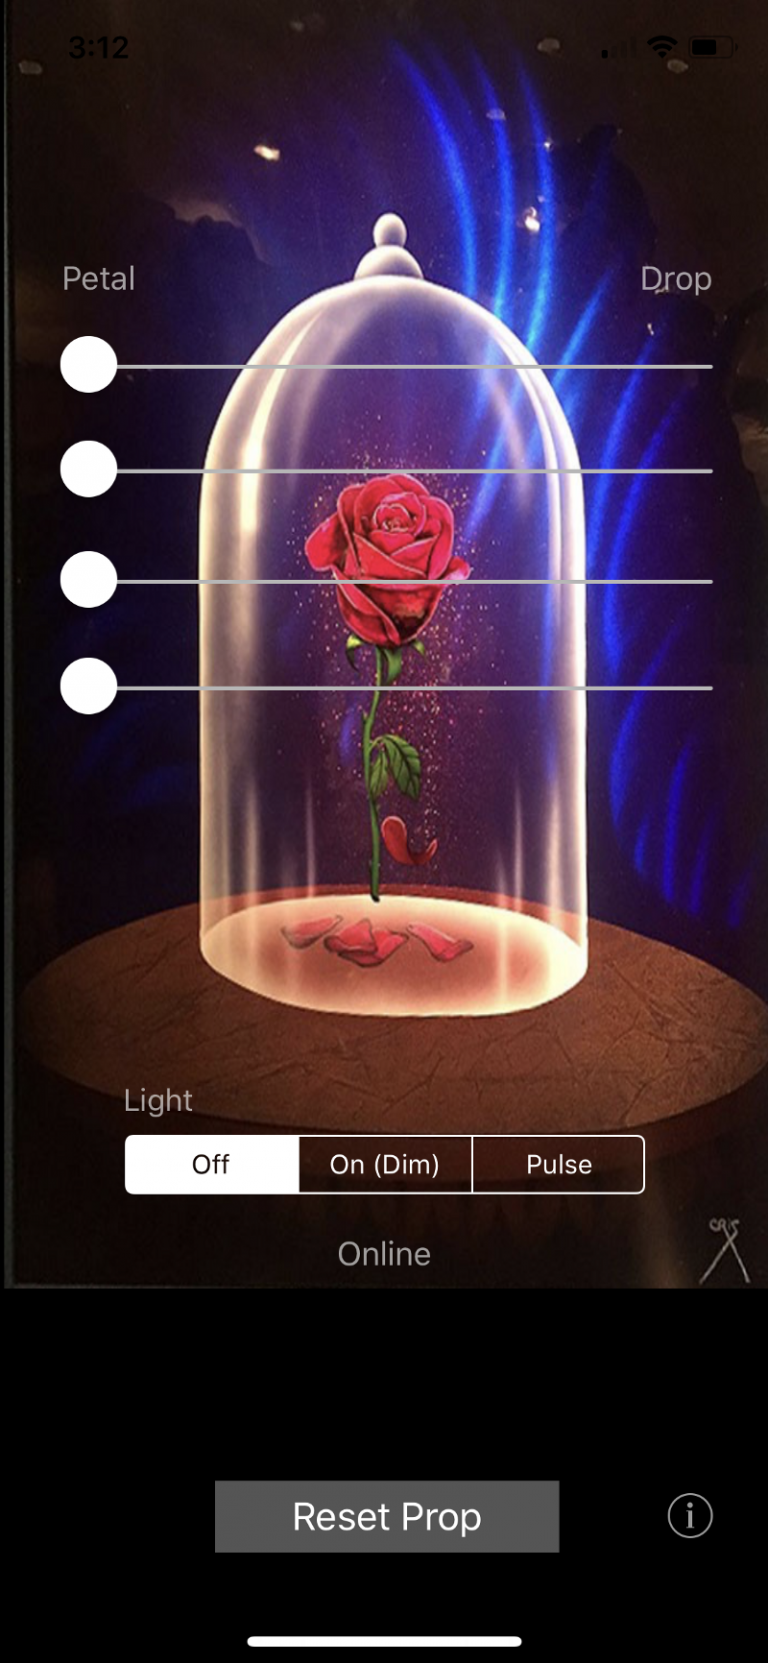
Control via mobile web browser
Durable enough to ship
Do NOT require that it connect to a local internet
Easy to use interface that an elementary school stage crew could use
Easy on-site setup. Ideally, just turn it on and it works.
Parts List
Breadboards
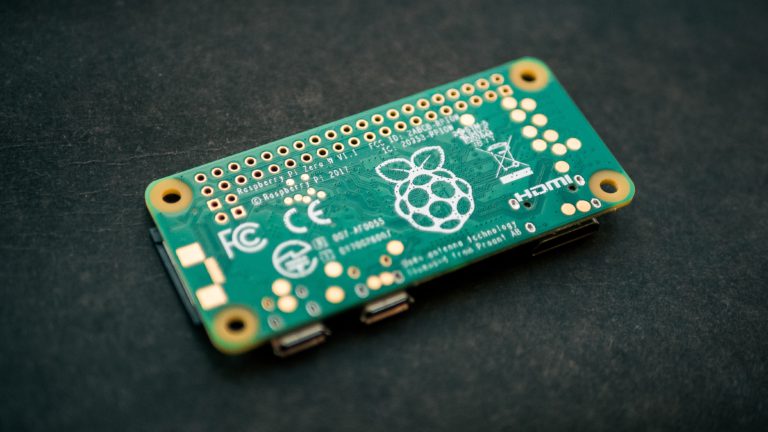
Raspberry Pi: I used a Raspberry Pi Zero 2W, but any Raspberry Pi which has onboard wifi will work, such as a 3B+, 4, Zero W, etc. Do not choose a Pico; that’s a different product line. You’ll also need a MicroSD card to store the operating system.
Cloche: This was the widest and tallest one I was able to find for easy ordering. But I really did prefer the one I was able to find for the 1.0 build 4 years ago. This one is just barely big enough. Shop around — you may have better luck finding a wider one in a local arts and crafts store. You really want one that is fairly wide, because the petals need to fall freely and not get hung up against the side.
Enchanted Rose with silk petals – look for lightweight petals. The standard one on Amazon is too heavy — I went to Etsy to shop for mine.
Toothpicks — You are looking for ones which slide in and out of the aluminum tubing very easily, but which also block the most amount of air (to build up pressure — you need some force on these to pop the petal.)
Aluminum metal tubing (small) — The purpose of these aluminum tubes is to eliminate a lot of friction that existed between the toothpick and the pneumatic tube. In other words, toothpicks and these tubes sort of act like a blowdart. By using aluminum tubing as a gasket within the pneumatic tubing, a lot of the friction is reduced.
Pipe insulation foam for vibration-dampening, to just fit around the pumps
Before You Begin
You’ll want to get your Raspberry Pi set up with Raspbian OS on a micro-SD card. Make sure you have SSH access to your RPi. You might also want to set this up to present its own SSID/wifi network. I’ve got a blog post on that here.
If you’re new to Raspberry Pi, here’s one video to get you started in setting up the operating system and SSH:
I also loved using Visual Studio Code’s “SSH” remote features. Setting this up can be a tiny bit tricky, but stick with it. Once you get this working, it’s incredibly productive. It allows you to use your desktop (Mac, Windows or Linux) to work with files and directories on your RPi.
NeoPixels will also require ROOT-level permissions on your Raspberry Pi to install some drivers. Now, there are all kinds of security folks telling you that using root on your Raspberry Pi is a bad practice for stuff like this. But since this is a simple stage prop, I had no problem with the idea of just using my root user and a password for the entire build, and it saved a lot of file permission headaches to just be “root” and be done with it:
Set a password for the root user, reboot your pi, and connect in as root from then on. While it may not be “best practice” for security, trust me, you’ll save a lot of headaches with installing libraries etc.
Assembly
There’s both a hardware circuitry part and a software part. Let’s get some of the basic circuitry working first.
For ease of explanation, the hardware components can be thought of as three different “zones,” all powered by a single Raspberry Pi. These zones don’t need to talk to one another, except that all ground wires should be connected together and also to the RPi’s GND pin.
There are two zones powered by 4.5V: The Fairy lights and the Neopixel lights. There is one zone powered by 12V: the pump zone.
(DO NOT power the Neopixel lights with the 8 AA batteries (12V) used to power the pumps, as you will permanently damage the Neopixels!)
Zone 1: Control the stem lights (4.5V)
Let’s start here, because it’s the easiest circuit. These fairy lights are controlled by 3 AA batteries (4.5V.) You want to be able to have a GPIO pin on the Raspberry Pi toggle tell a transistor to allow current to flow to power these lights.
Cut the fairy light wire, and strip the ends. It’s a bad idea to power the LED directly from the Raspberry Pi, as altogether, the current draw might be more than the Pi can handle. So, you’ll want to use a standard Transistor (like a TIP 102) to switch the current.
Now, run a wire from the GPIO pin of choice — I chose pin 25 (BCM) — to the “base” pin of the transistor. When this is toggled HIGH, it will close the circuit of the LED fairy lights and thus turn them on or off programmatically.
Zone 2: Control the 4 pumps (12V)
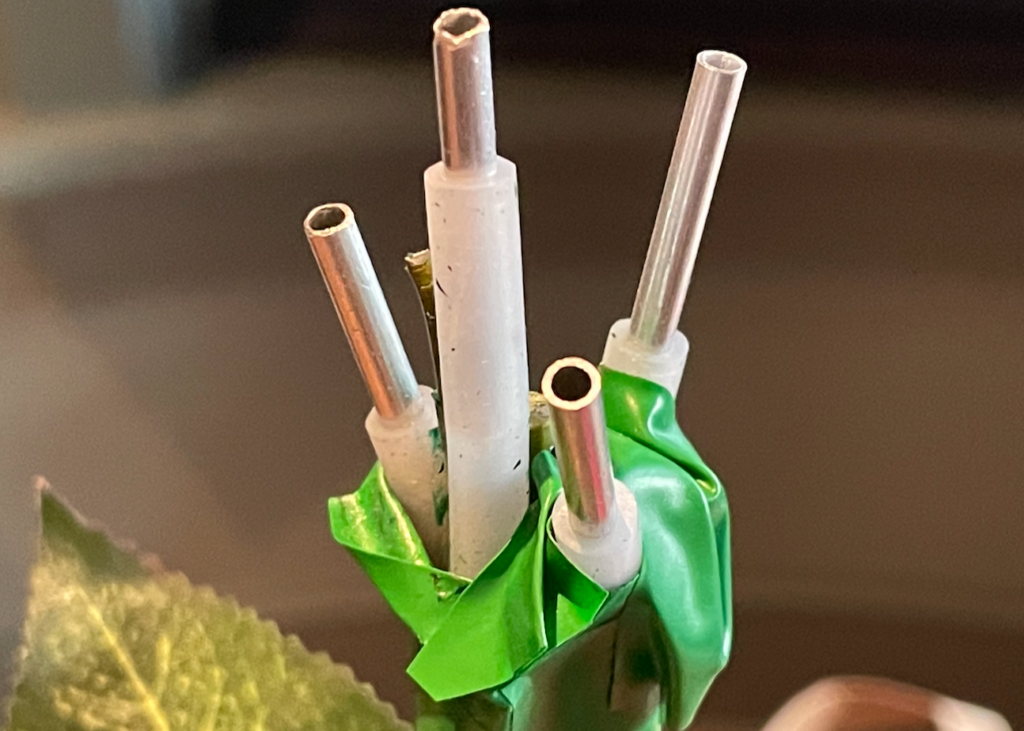
The main mechanism to drop these petals is to blow air through tubes which have loose petals. I chose to cut some aluminum tubing to reduce the diameter of airflow and also to reduce the friction with the wooden toothpicks:
For the electronics, you need a diode for each of the 4 pump circuits, for the reasons described in this video (where this video says “solenoid”, substitute in the “pump” in your mind — the same principle applies):
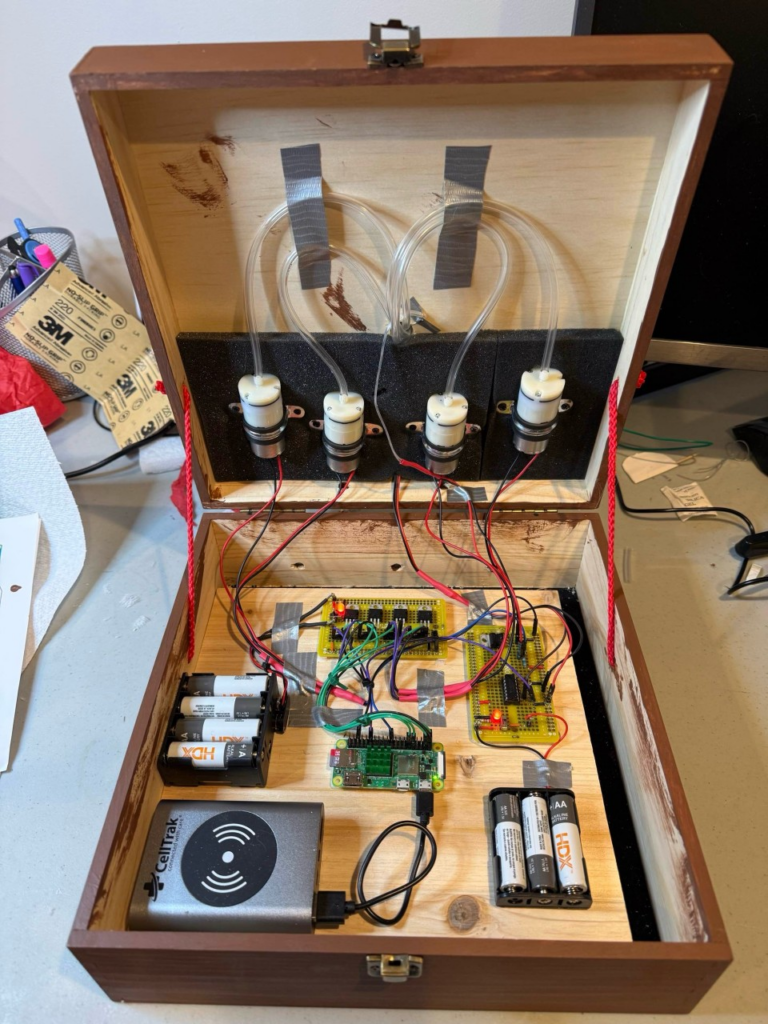
In my Enchanted Rose prop, I built a breakout board with a bunch of these MOSFET transistors and diodes. I overbuilt this board, making it with 6 different circuits when it only really needed 4. It’s messy looking, but pretty simple. Each of these circuits has a MOSFET transistor and a diode. Take care to get the direction of the diode correct — it needs to be pointing toward the positive load. (A diode is rather like a backflow valve in plumbing — it allows current to flow in only one direction, toward the “ring” on the diode.) The yellow wires in this photo below come from the Raspberry Pi (GPIO pin) and when they are HIGH, they allow current to pass from the “Base” of the transistor to the “Emitter.”
Basically you want four circuits which allow the GPIO pins on the RPi to turn on and off the motor. A single such circuit looks like this. (Note that instead of a 9V battery, I “overclocked” it with a 12V battery pack — I found these pumps can handle short bursts of 12V.)
Each pump motor needs a circuit like the below. Since RPi cannot output 9V, we’ll make use of a transistor to switch a supplied 9V current on and off. (Note that in production, I ended up boosting the power supply to 8 AA batteries, or 12V. The motors can handle this higher voltage for short duration, even though they’re rated for 6-9V.)
When you make six such circuits on a PCB board and don’t spend too much time cleaning up the build, it looks like this:
I cut insulation foam for these motors (pipe insulation) which helps reduce the vibration sound a bit.
Since these motors generate current spikes when they are powering down and powering up, it’s very important to protect your RPi with a diode, as follows (the directionality matters! pay attention to the line on the diode and the positive lead from the motor):
Zone 3: Control the Neopixel accent lights (4.5V)
DO NOT POWER THE NEOPIXEL WITH ANYTHING GREATER THAN 5V, AS YOU WILL PERMANENTLY DAMAGE THEM.
The python code to control the Neopixel needs a set of libraries called “CircuitPython” to work. You’ll need to follow the NeoPixel Adafruit guide to installing CircuitPython.
I strongly recommend you read through the NeoPixel to Raspberry Pi Wiring Guide on Adafruit, which is likely to be more up-to-date than anything I’m providing here. I went to a 74AHCT125 level-shifter chip to map the Raspberry Pi’s 3.3v output to proper 5V levels. Note that the power cord shown in the diagram below simply feeds out to the 4.5V battery pack. The ground rail needs to be connected to the RPi’s ground rail. All the grounds in this project all connect together, and connect back to the Rpi’s ground. You can and should run both the LED fairy lights and the Neopixels off the same battery pack.
I’ve published two Github repos that should really accelerate your work here: “stevemur/enchantedrose” and “stevemur/enchantedrosepython”.
First, let’s run through what you need, because it’s helpful to see this at a high level. If you want to go the easiest possible route, set your RPi to render its own wifi network, and make sure you configure your Raspberry Pi so that it is known as 196.168.11.1 on its own wifi network; that’s what the software is built for.
You will need the following software components set up:
Website software to deliver a nice user interface so that people don’t need to call an API directly to change the lights, drop the petals. See this Next JS Front-End Repository on Github. Run this on an Apache web server on the Raspberry Pi. To do this, set up an Apache Web Server on your Raspberry Pi. Make sure it’s working by visiting the IP address of your Raspberry Pi from a web browser. Next, take the “out” folder from the repository above, and place it in your Raspberry Pi’s /var/www/html folder. You should then have a web front-end that is calling locally to the device’s Flask port (hardcoded in the source as: http://192.168.11.1:5001).
Set up the web server and the API, and make sure they start properly at Raspberry Pi boot-up.
Make your Raspberry Pi its own local wifi network, so you don’t have to rely upon tapping into the router or a network wherever your production happens.
Configuring Raspberry Pi for “Ad Hoc Network”
Now, how do we get a mobile phone to reach the Raspberry Pi? Of course, if we know the networking details at the production venue, we could in theory just have the RPi join the wifi network of the theatre, and then somehow go to the theatre’s router settings and look for its address. But that’s a pain and doesn’t scale well.
So I was excited to hit upon the idea of having the prop create its own “Ad Hoc Network” (i.e., it’s own Wifi SSID that you can join.) Not only does this eliminate the need to have the stage manager at each playhouse somehow find a way to connect the prop into their own local network, but it removes any requirement for a display or keyboard to ship with the device for configuration purposes.
All they you to do is plug in the device, wait for boot-up, and it presents its own Wifi Network (“EnchantRose”.) You then simply enter the password, bring up a web browser on their phone, and visit a pre-determined IP address which I’ve configured: http://192.168.11.1.
It took a while to figure out how to configure Raspberry Pi to do this, since the instructions have changed seemingly with every release of Raspbian, the RPi operating system. But I figured it out by adopting existing instructions, and blogged about it here. The steps in that blog post provide all you need to do to get your Raspberry Pi setting its own network. To ensure the Enchanted Rose repository code works, be sure to set your network to the instructions given — you want the RPi to be able to reference itself on its own network as 192.168.11.1.
What’s most exciting about this is that it’s a pattern that can has many applications in the world of “Internet of Things” — run Apache2 on your Raspberry Pi to host a website, and render that website visible via the Rpi’s own password-secured wifi network.
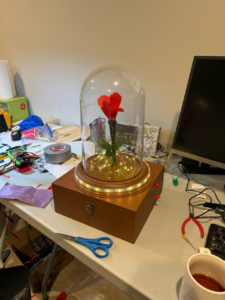
The new version 2.0 prop is fully functional. I’ve sold it and shipped it to one of the many production managers who have inquired. As this post continues to get indexed by Google, I get hit up for these builds; at this writing it’s over a dozen such requests, from FL, CA, HI, UK, NJ, CO and more.
UPDATE, late January 2023: This 2.0 prop is sold to a production in Hawaii, and has been shipped off.
I’ve decided for now that the logistics and expense of shipping these out to productions is just too complicated, but I’d love to hear from you if you’ve built one of these. If you’ve got specific questions on assembly or the software, drop me a note. On with the show!
A Reader’s Build!
Since posting this, I’ve gotten some feedback and questions on it from builders around the world. Ron Hirsch of Illinois writes in, granting full permission to re-publish:
Hello! I am a retired software engineer, and my daughter is a middle school teacher who is directing Beauty and the Beast Jr. for her school play this spring. She invited me to work on a remote- controlled rose prop, and we came across Steve’s wonderful blog post about the multi-featured prop he designed. There are certainly many ways to go about this project, but I wanted to share details of my process in case this helps anyone. Have fun!
ENCLOSURE
The cloche was the most difficult part to source. I found someone selling a used acrylic 8” round one with a wood base on eBay, nice because kids can’t break it easily. The dome is about 13” tall. It may be possible to glue some kind of knob to the top so it can be picked up easily.
The box is a 11.5” square pine box with a hinged lid, from makerflo.com. I removed the hinge and latch hardware and set it aside. The hinges are not strong, so I drilled holes on the sides of the box through which I could run knotted lid stays made from gift bag drawstrings. At the craft store (Michaels) I found an 11” round bare clock surface with beveled edges. I sanded the varnish off the cloche base and wood glued and clamped it to the clock surface, then glued that assembly to the top of the box lid. I also got a narrow wood dowel at Michaels to serve as the “stem”, cut it to size and drilled a shallow hole dead center in the cloche base, and wood glued in the dowel. I drilled a larger hole right behind the stem which goes all the way down into box, for running the air tubing and the stem light through. I drilled a few holes in the back of the box in case heat dissipation was needed, and another small hole behind the back of the cloche base to run the NeoPixel wiring through. I sanded then painted the box with a couple coats of brown acrylic paint, then reassembled the hinges and latch. I painted the stem with green acrylic paint (an all-surface paint that also can be used on the silicone air tubing.
ELECTRONICS
I used the Raspberry Pi Zero 2W per Steve’s specs. For the kit I ordered I had to solder in the header pins, although it is possible to buy it with pre-soldered headers. I put a heat sink on the CPU. I got a SanDisk 32GB microSD card to hold the OS and a card reader/writer so I could write the boot images from my laptop. I used an AC adapter to power the RPi while I worked with it initially, but for the finished project I am using a phone charger power bank that I had sitting around to supply the 5V to the RPi. Capacity of this should be a few hours – more than enough for a rehearsal or show performance but the crew will need to remember to recharge it beforehand.
For the pump and light circuits, I first prototyped with solderless breadboards, then used solderable breadboards from Amazon to make things robust. I added power switches with LED indicators, to make sure the batteries aren’t being drained when the prop isn’t in use. I soldered in male header pins so I could run Dupont cables from the RPi, pumps, and lights to the breadboards. In some cases I had to splice together custom cables and used heat shrink tubes to insulate.
For the stem light, the circuit I used is like this:
* Positive wire of LED string -> 470 ohm resistor -> 5V
* Negative wire of LED string -> Collector pin of TIP102 transistor
* RPi GPIO pin 25 -> 1K ohm resistor -> Base pin of TIP102
* Emitter pin of TIP102 -> ground
I attached the stem light string to the cloche base by hot gluing down the wire between all the LEDs, leaving some slack so the LEDs themselves could be bent upward for a random fairy light effect.
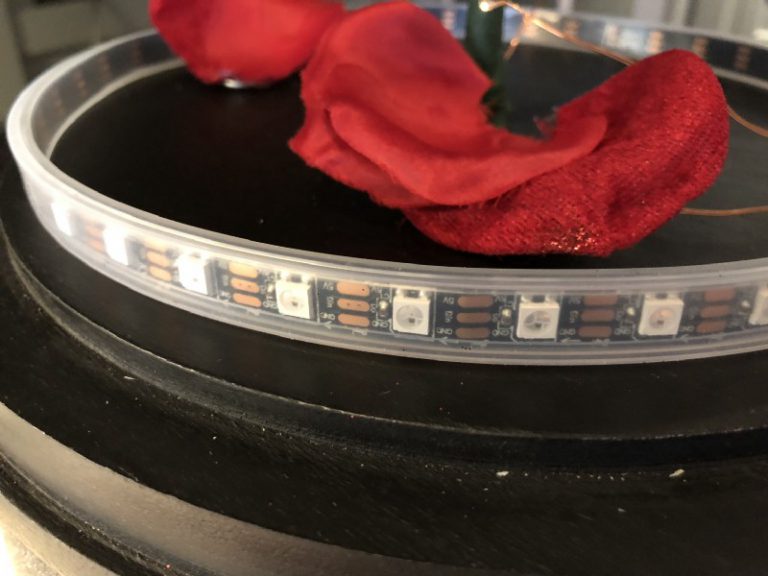
For the NeoPixel LED strip, I got a connector clip kit from Amazon and used one of the clips to connect the end of the strip to three 22-gauge wires, which I ran through the hole at the back of the box. I cut the LED strip to fit around the cloche base (made sure to cut at the designated spot along the 3 copper terminals!), then used double stick tape to mount the LED strip all the way around the cloche base.
The 8 AA and 3 AA battery holders were also from Amazon. I mounted the circuit boards and batteries onto a plywood board using double stick velcro strips, secured the board inside the box, and wired everything up.
The 6V pump motors were no longer available as part of a kit from Amazon, but I was still able to buy the pumps individually there. I got the silicone tubing (3mm inner diameter) separately and cut it into 4 lengths for use by the pumps. The package of aluminum tubes from Steve’s Amazon link had one size tube that fit snugly inside the air tubing… I believe it’s the 1/8 inch tube. I divided it into 4 small sections using a hacksaw… had to be careful not to bend the metal since the opening needs to be almost perfectly round to load the toothpick smoothly. I glued a piece of foam to the lid underside and mounted the air pumps using 1-inch hose clamps insulated with rubber. The air tubes go up through the lid and are secured to the stem with clear twist tie (available on a roll from Amazon). I cut and glued a round painted piece of styrofoam to give the tubes stability at the top.
PETALS
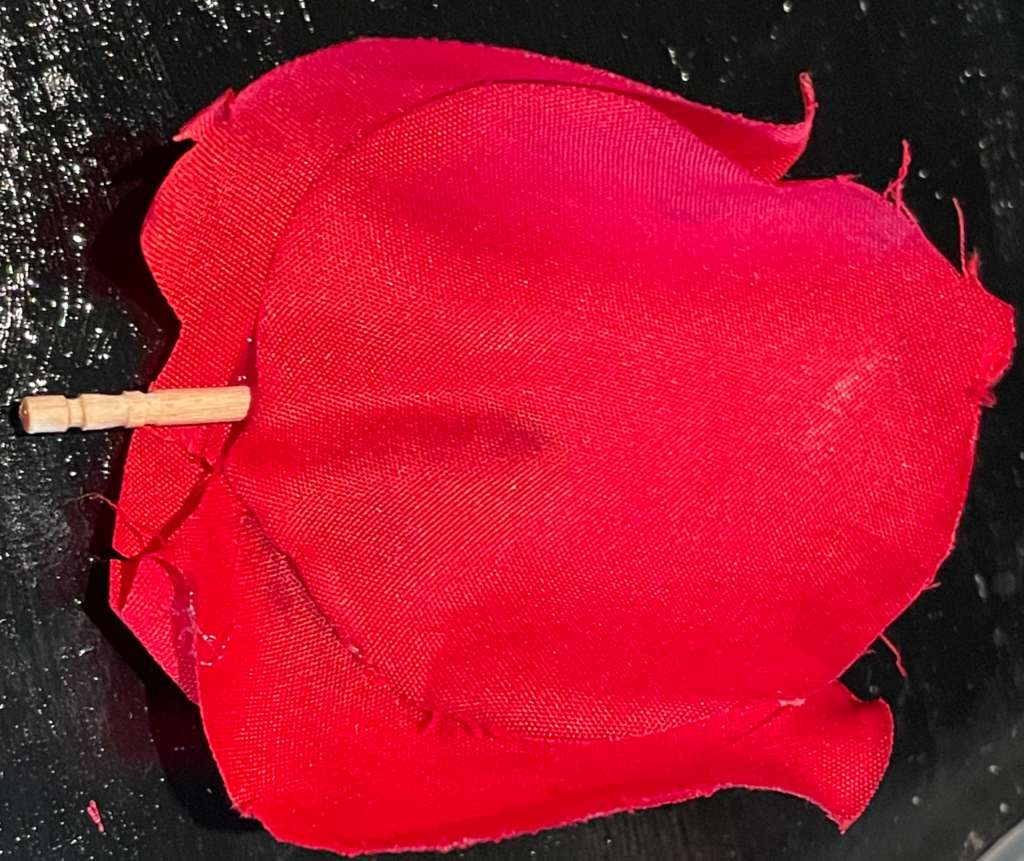
The rose petals took a lot of trial and error. Silk rose petals I tried were too heavy. I found that red tissue paper glued so it is 2-ply and hot glued to half of a round toothpick is super light and dependable – cut to a shape that looks convincing enough but allows for minimal interference from the cloche and the other petals. The round end of the toothpick, not the sharp end, is what goes into the air tube, and it needs no more than a quarter inch of insertion to stay seated. It’s important that the toothpick has friction-free movement when loaded into the tube, so it doesn’t get snagged when “deployed.”
SOFTWARE
Through more trial and error, I found that the OS I needed to install was Bullseye, which can be downloaded as an archived image. Buster is too old to work with the currently available NeoPixel libraries due to a Python versioning issue. Bookworm is too new to work with Steve’s instructions for setting up the RPi as a standalone network, at least in my attempt. Bullseye splits the difference and works for both NeoPixel and the networking piece. I am able to SSH to the RPi from my Windows machine so I can get to the Linux shell for tweaks and troubleshooting.
I made a few changes to the Python control code. Since I used a TIP102 transistor for the stem light circuit, I had to reverse the high/low polarity in the rpi_control.py code (which assumes an 8550 transistor).
I shortened the pump activation duration in rpi_control.py from 1 second to .33 seconds to make it a little less noisy, though a longer puff may possibly be needed depending on the petal design.
The process of setting up the NeoPixel libraries was the most complicated part of the software setup, but I got through it with the help of Steve’s link to the Adafruit guide.
The code had several references to the number of pixels in the strip being 60 … I had to change that to 24 due to using a single strip cut to fit the cloche diameter.
Just for fun, I customized the rainbow and chase actions in neopixel_control.py to do 20-second animations that can be used during the show. The chase animation starts out slow and picks up speed as it goes, and works well paired with the music for the Beast’s dramatic transformation at the end!
I noticed the “Pulse” button was not hooked up to any action in Steve’s code, but changing that would require modifications to the React part of the project, which I ran out of time to attempt.
CONTROLLER DEVICE
I had an old deactivated iPhone sitting around, so I made that into a dedicated controller that autoconnects to the rose wifi and has an icon to go into the control app.
So it’s all ready to go … can’t wait to see it used in the show!
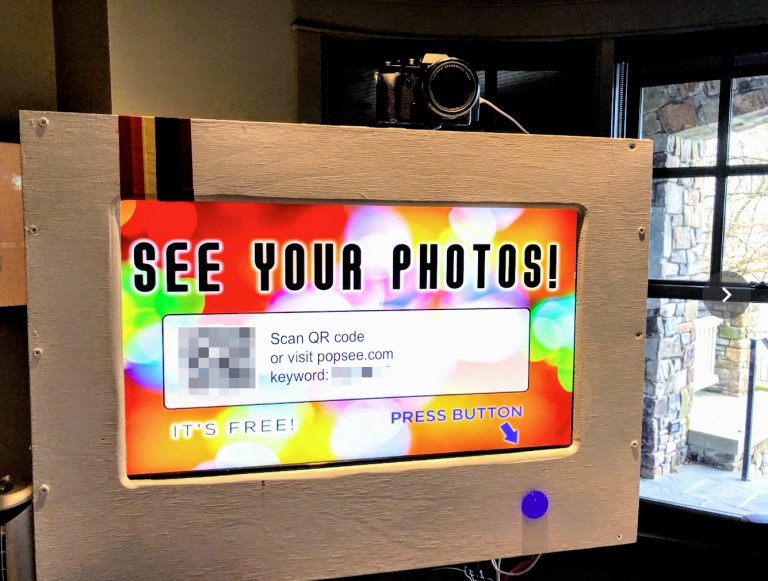
Photo booths are expensive to rent. But if you have a camera and an old monitor lying around, you can make a much more versatile photo booth for less than $100!
NOTE: There’s a version 2.0 of this project! Follow this link for information on Enchanted Rose 2.0. My daughter is in Beauty and the Beast this spring. So I thought it’d be a good opportunity to test my Internet of Things (IoT) skills using Arduino, Bluetooth and iOS, and build a remote-controlled Enchanted Rose prop…
Part 1 of this article covers the basic parts list, code, and assembly. UPDATE (January 2023): I’ve built a version 2.0 of this prop. See “Enchanted Rose 2.0: Raspberry Pi Prop with Falling Petals” for updated instructions. UPDATE (April 2021): The Bluetooth shield used in this Arduino-based project is apparently discontinued. If I were to…
The Raspberry Pi microcomputer is great for building “Internet of Things” devices. This technical post describes the steps to get your Raspberry Pi to broadcast its own local network and bridge to an Ethernet network if available. There are other guides showing how to do this on the Internet, but they are often woefully out of date, leading people down real rabbit holes.
Just wondering how to connect the fairy lights to the breadboard with the transistor. Mainly just wondering if there was a diagram to look at, I’m of a visual learner and don’t know too much about this stuff.
Thank you for this guide. Does the rose need to be connected to the World Wide Web (internet) once programmed as our theatre venue does not have internet access. And whilst I can currently connect to the raspberry pi from my laptop wirelessly, it is suggesting that the raspberry pi needs to be connected to the internet.
Many thanks
Alfie
Nope! In fact it generally cannot be — it uses its own local wifi connection.
thank you for your reply. im having trouble with the rose drop part of the circuit. for some reason the pump is being powered without the raspberry pi being on. do you have any insite into what could be the matter
many thanks
Alfie
i found out the issue, i think the diagram above shows the pump wired slightly incorrectly. changing the location of the negative pin of the pump to the middle pin of the transistor (collector) making the pump in parallel to the diode solves this issue
Thank you for the correction! Good catch. I hope this helps other readers.
Hey Steve! What brand of breadboards did you use? I’m not sure what ones to buy :).
Does anyone have a guide or general tutorial on how I go about installing and making the Enchanted Rose Flask API run each time the Raspberry pi boots?
When I go to the ip address on my phone in the text box at the bottom it says “ERROR: API service on device is not responding. Check that the python flask app is up and running” and when i try to drop any petals or do anything with lights it says network error. Do you know what I need to do to fix this?
This message will happen if for some reason the controller app cannot reach the IP address of the controller. Make sure the IP address is correct via tools like Postman first.
Steve,
Maybe I am missing something but I am at a loss on the python coding and front end app installation onto the RPI. Any guidance on helping someone who is not as up to speed on that level of tech development?
Hi Craig,
It’s been a while since I created this project, but as I recall, I got Visual Studio Code to connect to the Raspberry Pi, and then could browse the files and create them from the VS Code IDE.


Just wondering how to connect the fairy lights to the breadboard with the transistor. Mainly just wondering if there was a diagram to look at, I’m of a visual learner and don’t know too much about this stuff.
Hi Luke — you might find this video helpful. Basically, the transistor simply acts as a switch. https://www.youtube.com/watch?v=CD9-oPzJL0I
Thank you for this guide. Does the rose need to be connected to the World Wide Web (internet) once programmed as our theatre venue does not have internet access. And whilst I can currently connect to the raspberry pi from my laptop wirelessly, it is suggesting that the raspberry pi needs to be connected to the internet.
Many thanks
Alfie
Nope! In fact it generally cannot be — it uses its own local wifi connection.
thank you for your reply. im having trouble with the rose drop part of the circuit. for some reason the pump is being powered without the raspberry pi being on. do you have any insite into what could be the matter
many thanks
Alfie
i found out the issue, i think the diagram above shows the pump wired slightly incorrectly. changing the location of the negative pin of the pump to the middle pin of the transistor (collector) making the pump in parallel to the diode solves this issue
Thank you for the correction! Good catch. I hope this helps other readers.
Hey Steve! What brand of breadboards did you use? I’m not sure what ones to buy :).
Does anyone have a guide or general tutorial on how I go about installing and making the Enchanted Rose Flask API run each time the Raspberry pi boots?
When I go to the ip address on my phone in the text box at the bottom it says “ERROR: API service on device is not responding. Check that the python flask app is up and running” and when i try to drop any petals or do anything with lights it says network error. Do you know what I need to do to fix this?
This message will happen if for some reason the controller app cannot reach the IP address of the controller. Make sure the IP address is correct via tools like Postman first.
Sure! A quick Google found this: https://forums.raspberrypi.com/viewtopic.php?f=91&t=314455
Any brand works well, but I happen to like the smaller half-size breadboards that clip together if you need to make something more full-size. Here on Amazon: https://www.amazon.com/ELEGOO-tie-points-breadboard-Arduino-Jumper/dp/B01EV640I6/ref=sr_1_3?crid=24UPVYGTYD557&dib=eyJ2IjoiMSJ9.xh4vg2Hy23o-P-D6ldJAwalTbwxXaNDdRrTakio8PViZoB6QbhmnYdrNCbMRTEt3gIGvCmKGyaC0oWp2G8KZPX-mLGQA0XxJxJnqP2r5u6cNi1v5kDD6hueVEfvzQ_hicqXapRt-c8ZpM2LfMjH9grpO2IXq2Hyp7LXwAbBNEVmFuj6wT5-oa5hxRcF0dWTqZqISectO9zF-PgdGPCr0SWk9YfTAqO0pMYZ-PxX4DJY.2SUgeAcFGeNNl6ei39BOTgqwrPi2YSJfO_5zKyJ-a10&dib_tag=se&keywords=half+size+breadboard&qid=1733418161&sprefix=half+size+bread%2Caps%2C160&sr=8-3
Steve,
Maybe I am missing something but I am at a loss on the python coding and front end app installation onto the RPI. Any guidance on helping someone who is not as up to speed on that level of tech development?
Hi Craig,
It’s been a while since I created this project, but as I recall, I got Visual Studio Code to connect to the Raspberry Pi, and then could browse the files and create them from the VS Code IDE.
Start here: https://www.raspberrypi.com/news/coding-on-raspberry-pi-remotely-with-visual-studio-code/